Digital research alliance of Canada - Research Computing Intro
Register an account
https://alliancecan.ca/en/services/advanced-research-computing/account-management/apply-account
Access to the system
- interacitve access: ssh client
- linux/mac: builtin command: ssh
- windows:
- cmd ssh
- WSL ssh
- client
- MobaXterm: processing console for remoter computing Linux for communicating with machine
- PuTTY example:
[name@server ~]$ ssh -Y username@narval.alliancecan.ca
# machine name will be something like narval.alliancecan.ca
# username is default account
# password is the same one used to log in to CCDB
# the option -Y forwards X11 traffic which allows you to use graphical aaplications on the remote machine such as certain text ediors (MobaXterm is allowed under windowow, Linux already installs the X11 server)
For more on Windows-based SSH clients, see: Connecting with MobaXTerm
For more on generating key pairs, see: SSH Keys Generating SSH keys in Windows Using SSH keys in Linux
For how to use SSH to allow communication between compute nodes and the internet, see: SSH tunnelling
For how to use an SSH configuration file to simplify the login procedure, see: SSH configuration file
Data
Folders/Filesystem
- HOME(/home/ycao68):
- personal area. Libraries, software, get installed.
- Links to projects (data) and scratch through symbolic link.
- logical use: source code, parameter files, job submission files
- default quota: 50GB and 500K files per user
- SCRATH (/scratch/ycao68):
- personal area.
- Processing folder
- I/O (globus? Programmatically?)
- no backup, cleanup regularly (60 days).
- logical use: intensive read/write operations on large files (>100 MB per file), temporal files like checkpoint files, output form jobs and others data can be esily be recreated.
- default quota: 20TB and 1M files per user
- PROJECTS (rrg-ncoops/project/…)
- Data storage folders
- Shared between all users
- changing access permissions (group_)
chmod -R 770 /project/6007962/C2C/C2C_products/Species/*chgrp -R wg-ntems /project/6007962/C2C/C2C_products/Species/*- Deleting data when don’t need it - Limited storage and file number
- Archiving data - Not for processing - shouldn’t change many times in a month!
- default quota: 1TB and 500K files per group
- SLURM_TMPDIR:
- temporary folder on local filesystem on each compute node allocated to the job
- fastest
- only needed for the duration of the job
- shared between all jobs on the node, space depends on the compute node type.
- logical use: large collection of small files (smaller than a few megabytes per file), details see here
- Nearline storage details
- default quota: 2TB and 5000 files per group
Check the available disk space and the current disk utilizaiton for the project, hom, and scratch filesystems per group:
# diskusage_report
project space consumption per user:
lfs quota -u $USER /project
Data transfer between different locations
- Please use data transfer nodes, also called data mover nodes, instead of login nodes whenever you are transferring data to and from our clusters. ref
- You will need software that supports secure transfer of files between your computer and our machines.
- The commands scp and sftp can be used in a command-line environment on Linux or Mac OS X computers.
- On Microsoft Windows platforms, MobaXterm offers both a graphical file transfer function and a command-line interface via SSH
- If it takes more than one minute to move your files to or from our servers, we recommend you install and try Globus Personal Connect. Globus transfers can be set up and will run in the background.
- how: Globus
- To synchronize or sync files (or directories) stored in two different locations means to ensure that the two copies are the same
- MobaXterm (windows)
- sftp client (linux)
- Globus GridFTP to synchronize or sync files (or directories) stored in two different locations means to ensure that the two copies are the same (windows)
- Fileilla (windows, linux)
Data Storage in HPC
single node jobs
- If your dataset is around 10 GB or less, it can probably fit ==in the memory==, depending on how much memory your job has. You should not read data from disk during your machine learning tasks.
- If your dataset is around 100 GB or less, it can fit in the local storage of the compute node; please transfer it there at the beginning of the job. This storage is orders of magnitude faster and more reliable than shared storage (home, project, scratch). A ==temporary directory== is available for each job at
$SLURM_TMPDIR. The temporary character of $SLURM_TMPDIR makes it more trouble to use than network storage.
- Input must be compressed/copied from network storage to
$SLURM_TMPDIRbefore it can be read- Output must be copied from
$SLURM_TMPDIRback to network storage (scrath) before the job ends to preserve it for later use.- creating virtual environments inside your jobs using
$SLURM_TMPDIR- as using an application in a Python virtual environment generates a large number of small I/O transactions—more than it takes to create the virtual environment in the first place.- If your dataset is larger, you may have to leave it in the network/shared storage. You can leave your datasets permanently in your project space.
- On a ==distributed filesystem==, data should be stored in large single-file archives. On this subject, please refer to Handling large collections of files.
Multinode jobs
If a job spans multiple nodes and some data is needed on every node, then a simple cp or tar -x will not suffice.
- copy files to every node to the SLURM_TMPDIR:
[name@server ~]$ srun --ntasks=$SLURM_NNODES --ntasks-per-node=1 cp file [files...] $SLURM_TMPDIR
- compressed archives:
# zip
[name@server ~]$ srun --ntasks=$SLURM_NNODES --ntasks-per-node=1 unzip archive.zip -d $SLURM_TMPDIR
# tarball
[name@server ~]$ srun --ntasks=$SLURM_NNODES --ntasks-per-node=1 tar -xvf archive.tar.gz -C $SLURM_TMPDIR
Large collections of files handling
useful checking script
# recursively count all files in folders in the current directory
for FOLDER in $(find . -maxdepth 1 -type d | tail -n +2); do
  echo -ne "$FOLDER:\t"
  find $FOLDER -type f | wc -l
done
#  output the 10 directories using the most disk space from your current directory
[name@server ~]$ du -sh  * | sort -hr | head -10
Solutions
Local disk
in general, will have a performance that is considerably better than the project or scratch filesystems. You can access this local disk inside of a job using the environment variable $SLURM_TMPDIR. One approach therefore would be to keep your dataset archived as a single tar file in the project space and then copy it to the local disk at the beginning of your job, extract it and use the dataset during the job. If any changes were made, at the job’s end you could again archive the contents to a tar file and copy it back to the project space.
RAM disk
The /tmp file system can be used as a RAM disk on the compute nodes. It is implemented using tmpfs. Here is more information
- /tmp is tmpfs on all clusters
- /tmp is cleared at job end like all of a job’s other memory use, falls under the cgroup limit corresponding to the sbatch request
- we set the tmpfs size via mount options at 100%, which could potentially confuse some scripts, since it means /tmp’s size is shown as the node’s MemTotal. For example, df reports /tmp size as the physical RAM size, which does not correspond to the sbatch request
Archiving
HDF5
This is a high-performance binary file format that can be used to store a variety of different kinds of data, including extended objects such as matrices but also image data. There exist tools for manipulating HDF5 files in several common programming languages including Python (e.g. h5py). For more information, see HDF5.
- Usage:
- load all modules (hdf, hdf5, hdf5-mpi)
module -r spider '.*hdf.*' -
serial hdf5:
[name@server ~]$ module load hdf5/1.8.18 [name@server ~]$ gcc example.c -lhdf5 -
parallel hdf5:
[name@server ~]$ module load hdf5/1.8.18
[name@server ~]$ gcc example.c -lhdf5
example 2: h5ex_d_rdwr.c
[name@server ~]$ module load hdf5-mpi
[name@server ~]$ mpicc h5ex_d_rdwr.c -o h5ex_d_rdwr -lhdf5
[name@server ~]$ mpirun -n 2 ./h5ex_d_rdwr
- load all modules (hdf, hdf5, hdf5-mpi)
Single job processing
Batch mode
the computing servers are used by many users all the time but each user would like to be the only user of the system or at least that others do not interfere with his/her jobs. so for automatically realiing this si by using a batch job management system. The batch manager:
- looks at the users’ job needs
- controls the available resources
- assign resources to each job
- in case put requests in a waitting batch queue
SLURM Workload manager
- allocating access to resources
- job starting, executing, and monitoring
- queue of pending jobs management
- how
cd $SCRATH/exec_dir
# write your script using an available editor
vi script
commands for scheduler (resources + account_no)
#!/bin/bash
#SBATCH --nodes=1
#SBATCH --ntaks-per-node=4
#SBATCH --cpus-per-task=4
#SBATCH --time=1:00:00      # max 24:00:00
#SBATCH --mem=118GB         # max memory/node
#SBATCH --account=def-ncoops_gpu # account name, use command sshare -U to see what account groups you hae access to
#SBATCH --partition=xxx_usr_prod # partition name e.g., gll-usr-gpupro: compute nodes with gp-gpus
#SBATCH --gres=gpu:kepler:N # (N=1,2)
#SBATCH --qos=<qos_name> # qos name
#SBATCH --job-name=myjob # job name
#SBATCH --error=errjobfile-%J.err #stderr file
#SBATCH --output=outjobfile-J.out #stdout file
NOTE for long runing computations: If your computations are long, you should use checkpointing. For example, if your training time is 3 days, you should split it in 3 chunks of 24 hours. This will prevent you from losing all the work in case of an outage, and give you an edge in terms of priority (more nodes are available for short jobs). Most machine learning libraries natively support checkpointing; the typical case is covered in our tutorial. If your program does not natively support this, we provide a general checkpointing solution. More examples:
Commands for the system (linux commands)
cd $SLURM_SUBMIT_DIR
module load ...
execution commands
some tips for Module environment
$ modmap -m ...
$ modmap -p eng
$ module load ...
$ module list
$ module purge # clean the environment
$ module help ...
Submit the script to the scheduler
sbatch script.sh
# wait ... and check
squeue -l -u <username>
squeue -l -j <job_id>
# cancel
scancel jobid#
scancel -u username (ALL)
The job completes: you can get final results
ls -ltr
some alias
see .bashrc file used by polimi course
cpu example 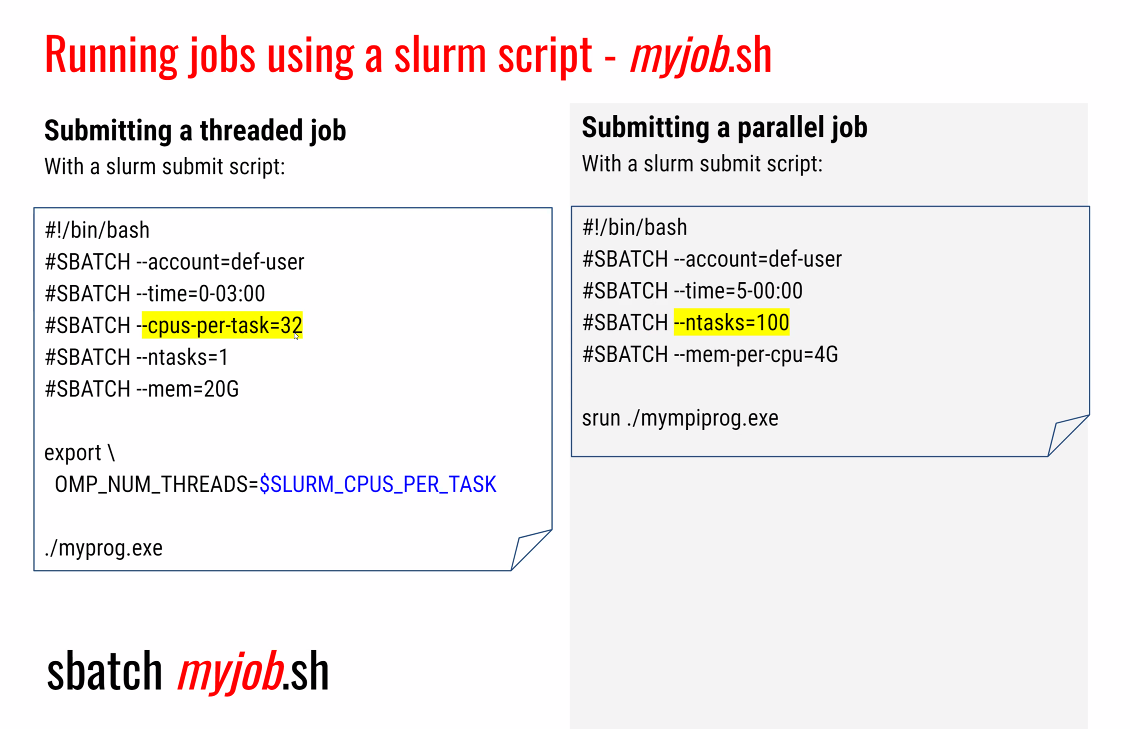
gpu example 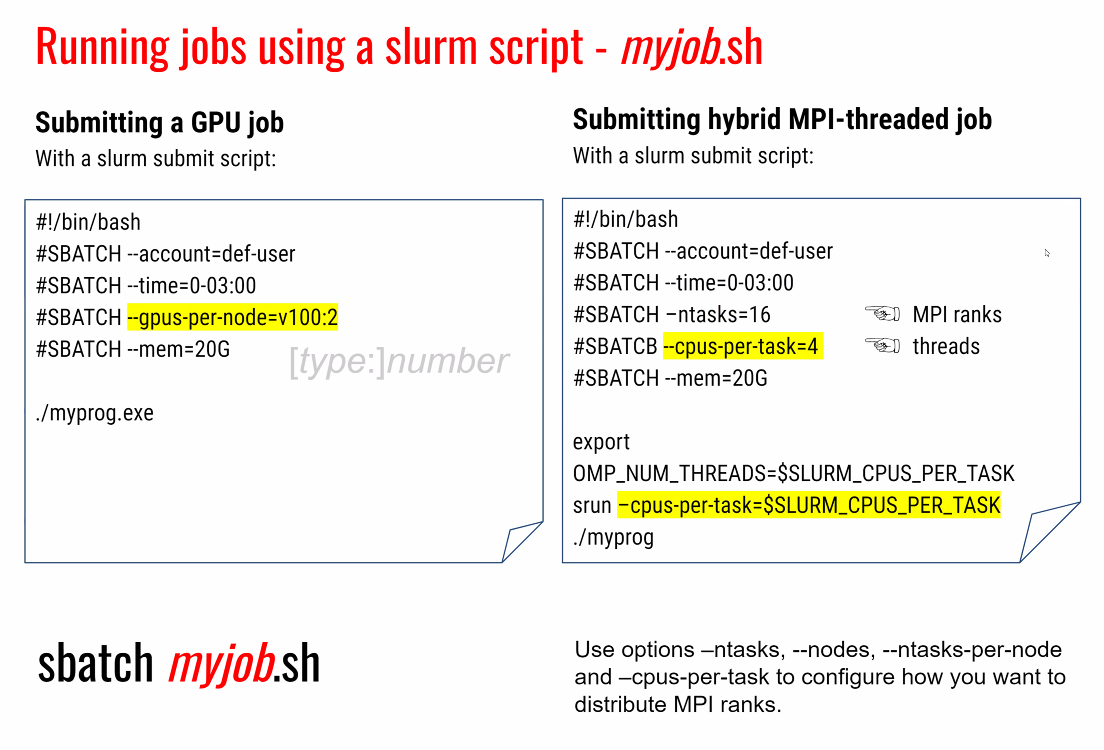
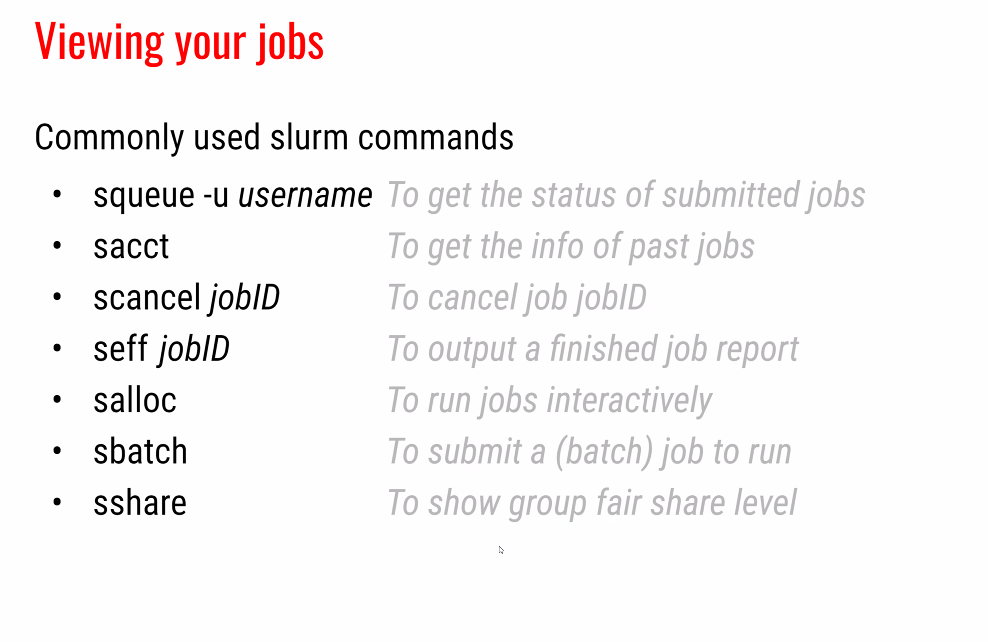
Run multi similar jobs
If you are in one of these situations:
- Hyperparameter search
- Training many variants of the same method
- Running many optimization processes of similar duration
… you should consider grouping many jobs into one. META, GLOST, and GNU Parallel are available to help you with this.
Experiment tracking and HP optimization
Weights & Biases (wandb) and Comet.ml can help you get the most out of your compute allocation, by
- allowing easier tracking and analysis of training runs;
- providing Bayesian hyperparameter search.
ML & DL steps
Step 1: remove all graphical dispaly in code
Edit your program such that it doesn’t use a graphical display. All graphical results will have to be written on disk, and visualized on your personal computer, when the job is finished. For example, if you show plots using matplotlib, you need to write the plots to image files instead of showing them on screen
Step 2: Archiving a data set
Shared storage on our clusters is not designed to handle lots of small files (they are optimized for very large files). Make sure that the data set which you need for your training is an archive format like tar, which you can then transfer to your job’s compute node when the job starts. If you do not respect these rules, you risk causing enormous numbers of I/O operations on the shared filesystem, leading to performance issues on the cluster for all of its users.
Assuming that the files which you need are in the directory mydataset:
$ tar cf mydataset.tar mydataset/*
The above command does not compress the data. If you believe that this is appropriate, you can use tar czf.
Step 3: Preparing your virtual environment
Python
-
load a pytho module
[name@server ~]$ module avail python # or a specific version [name@server ~]$ module avail python/3.10 -
load others: numpy, scipy, matplotlib, IPython, pandas
module load scipy-stack
virtual environment
Create a virtual environment in your home/project directory.
# load modules first then create a new env:
[name@server ~]$ virtualenv --no-download ENV
# activate it
[name@server ~]$ source ENV/bin/activate
# upgrade pacages
[name@server ~]$ pip install --no-index --upgrade pip
# exit env
(ENV) [name@server ~] deactivate
you can use the same env over and over again, but each time, you need to load the same modules
module load python scipy-stackand activate the envsource ENV/bin/activate
Install packages
once you have a env, you can compile and install most of python packages and their dependencies.
[name@server ~]$ module load python/3.10
[name@server ~]$ source ENV/bin/activate
(ENV) [name@server ~] pip install numpy --no-index # --no-index means install only from locally available packages not from PyPI.
(ENV) [name@server ~] pip install numpy tensorflow_cpu --no-index
(ENV) [name@server ~] pip install my_package --no-deps # --no-deps tells pip to ignore dependencies.
check versions:
list all versions contains “cdf”: avail_wheels "*cdf*" --all-version You can list a specific version of Python: avail_wheels 'numpy<1.23' --python 3.9 One can list available wheels based on a requirements.txt file with: [name@server ~]$ avail_wheels -r requirements.txt And display wheels that are not available: [name@server ~]$ avail_wheels -r requirements.txt --not-available
Creating a virtual environment inside of your single-node job
install on a single-node job:
where the requirements.txt file will have been created from a ==test== environment by:
 [name@server ~]$ module load python/3.10
[name@server ~]$ ENVDIR=/tmp/$RANDOM
[name@server ~]$ virtualenv --no-download $ENVDIR
[name@server ~]$ source $ENVDIR/bin/activate
[name@server ~]$ pip install --no-index --upgrade pip
[name@server ~]$ pip install --no-index tensorflow
[name@server ~]$ pip freeze --local > requirements.txt
[name@server ~]$ deactivate
[name@server ~]$ rm -rf $ENVDIR
Creating a virtual environment inside of your multi-nodes job
In order to run scripts across multiple nodes, each node must have its own virtual environment activated.
- In your submission script, create the virtual environment on each allocated node:
srun --ntasks $SLURM_NNODES --tasks-per-node=1 bash << EOF virtualenv --no-download $SLURM_TMPDIR/env source $SLURM_TMPDIR/env/bin/activate pip install --no-index --upgrade pip pip install --no-index -r requirements.txt EOF -
Activate the virtual environment on the main node:
source $SLURM_TMPDIR/env/bin/activate; - Use srun to run your script:
srun python myscript.py;example:
Troubleshooting
Check this link for python hanging, packages, envs…
PyTorch
install pytorch package
- Lasted available wheels
[name@server ~]$ avail_wheels "torch*" - Installing our wheel
- Load Python module
module load python - create env
virtualenv --no-download $SLURM_TMPDIR/venv - install pytorch in venv with
pip install
- Load Python module
- job submission script:
- python script:
- submit job:
[name@server ~]$ sbatch pytorch-test.shNote! from pytorch version 1.7.x to 1.11.x, 20x speedups using TF32 in Ampere and later Nvidia GPU architectures (==Narval!==) than using only FP32. However, such gains in performance come at the cost of potentially ==decreased accuracy==. So from 1.12.0, TF32 is disabled by default for matrix multiplications, enbled by default for convoloutions. To enable or disable TF32 on torch >=1.12.0:
torch.backends.cuda.matmul.allow_tf32 = False # Enable/disable TF32 for matrix multiplications
torch.backends.cudnn.allow_tf32 = False # Enable/disable TF32 for convolutions
pytorch with multi-cpus
- usage: small scale models (what scale is small? how many parameters?how many data?)
- how? see example
check python script here
pytorch with single-gpu
- advantages
- numerical operations - thousands of compute cores (gpu) vs single-digit count of cores (cpu)
- higher momory bandwidth than CPUs - more efficiently use their cores to process large amounts of data per comute cycle
- requirements
- massive number of operations can be performed in parallel - ==large models== (pytorch contains parallel implements of operators natively using CUDNN…)
- massive amount of data - ==large inputs==
- implementation
batch_size: increasing the size of our inputs at each iteration, putting more of the GPU’s capacity to use- increase the
batch_sizeto as much as you can fit in the GPU’s memory - but if you think small batch size is best for your application, go to Data Parallelism with a single GPU.
- increase the
num_workers: streamlining the movement of inputs from the Host’s / CPU’s memory to the GPU’s memory, thus reducing the amount of time the GPU sits idle waiting for data to process- Use a
Dataloaderwith as many workers as you havecpus-per-taskto streamline feeding data to GPU
- Use a
Example: check python script
Data parallelism with a single GPU
- usage: maximize GPU utilization with small inputs (batch size)
- how-to?
- Data parallelism - training over multiple replicas of a model in parallel, where each replica receives a different chunk of training data at each iteration
- gradients are then appregated at the end of an iteration and the parameters of all replicas are updated in a synchronous of asychronous fashion.
- using
DistributedDataParallelclass in PyTorch.Note! scale either the LR or the desired batch size in function of the number of replicas! see details
Pytorch with multi-gpu
Warning! torch1.10 may fail unpredictably with
DistributedDataParallel
Data parallelism with multiple GPUs
Def: perform training over multiple replicas of model in parallel, where each replica (in toal of N replicas) recieves a different chunk of training data at each iteration. N times speed up! Each GPU hosts a replica of your model! A model must good fit inside the memory of a single GPU!
Three methods: DistributedDataParallel class, PyTorch Lightning package, Horovod package
-
DistributedDataParallel class usage:
pytorch-ddp-test.py
- PyTorch Lightning package
- Horovod package
Model parallelism with multiple GPUs
Data and Model parallelism with multiple GPUs
For details on installation and usage of machine learning frameworks, refer to our documentation: PyTorch TensorFlow
Step 4: Interactive job (salloc) for debugging
We recommend that you try running your job in an interactive job before submitting it using a script (discussed in the following section). You can diagnose problems more quickly using an interactive job. An example of the command for submitting such a job is:
$ salloc --account=def-someuser --gres=gpu:1 --cpus-per-task=3 --mem=32000M --time=1:00:00
Once the job has started:
- Activate your virtual environment.
- Try to run your program.
- Install any missing modules if necessary. Since the compute nodes don’t have internet access, you will have to install them from a login node. Please refer to our documentation on virtual environments.
- Note the steps that you took to make your program work.
Now is a good time to verify that your job reads and writes as much as possible on the compute node’s local storage ($SLURM_TMPDIR) and as little as possible on the shared filesystems (home, scratch and project).
Step 5: Scripted job (sbatch)
You must submit your jobs using a script in conjunction with the sbatch command, so that they can be entirely automated as a batch process.
Important elements of a sbatch script
- Account that will be “billed” for the resources used
- Resources required:
- Number of CPUs, suggestion: 6
- Number of GPUs, suggestion: 1 (Use one (1) single GPU, unless you are certain that your program can use several. By default, TensorFlow and PyTorch use just one GPU.)
- Amount of memory, suggestion: 32000M - should I set to 40000M (as Naval has 40GB memory)
- Duration (Maximum Béluga, Narval: 7 days, Graham and Cedar: 28 days)
- Bash commands:
- Preparing your environment (modules, virtualenv)
- Transferring data to the compute node
- Starting the executable
Checkpointing a long-runing job
We recommend that you checkpoint your jobs in 24 hour units. Submitting jobs which have short durations ensures they are more likely to start sooner.
- Modify your job submission script (or your program) so that your job can be interrupted and continued. Your program should be able to access the most recent checkpoint file. (See the example script below).
- Verify how many epochs (or iterations) can be carried out in a 24 hour unit. Calculate how many of these 24 hour units you will need:
n_units = n_epochs_total / n_epochs_per_24h - Use the argument
--array 1-<n_blocs>%1to ask for a chain ofn_blocsjobs.
The job submission script will look like this: